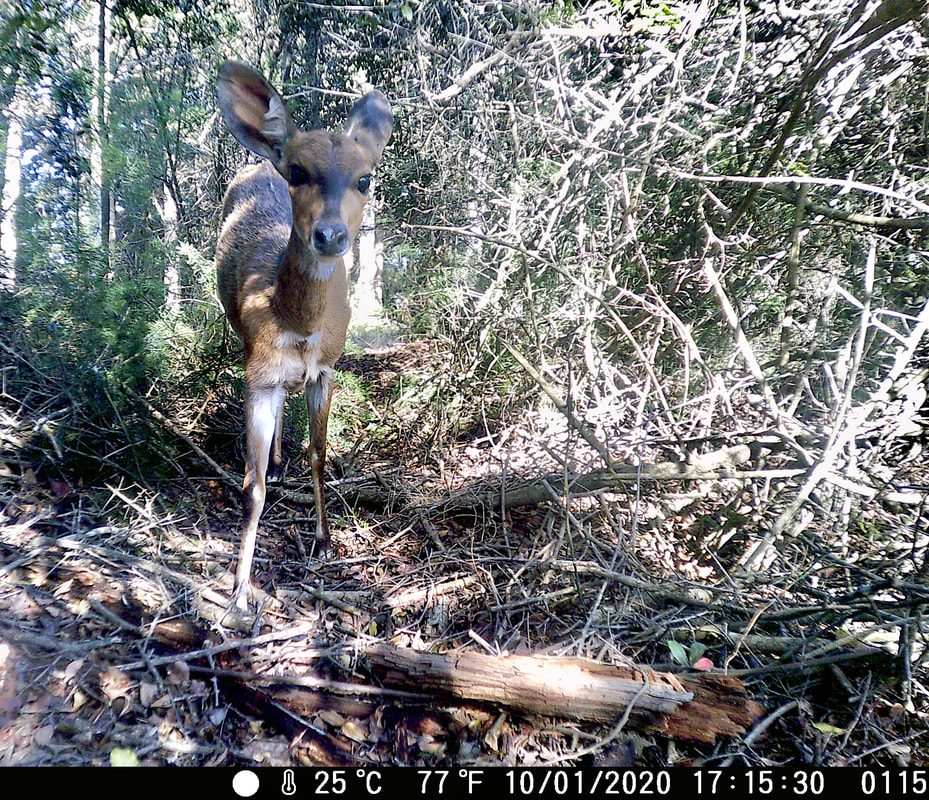
 Here at Strawberry Hill Farm we have started to use trail cameras. Trail cameras are remotely activated cameras that take photographs when a motion sensor is triggered. When an animal passes by the camera the cameras sensor will be triggered and the camera will take three photographs in series to ensure a good image. Using a trail camera is a way to photograph game without a human presence. This means that you can capture photographs of passing animals that would usually shy away from a human presence and thus the camera captures naturally occurring animal movement and behavior. The camera is also active 24/7 so you can be assured it won’t miss any action! Camera trapping is a great way to monitor species richness, estimate population densities of an area or just to find out what great animals are wandering around. We have put up trail cameras to observe what species inhabit our farm and as a way to roughly monitor population sizes of certain species, like our bush buck. We have even discovered particular routes individual animals take by seeing what time and order the animal appears at each camera trap site. We have also seen signs of leopard on our property and would love to get a picture of this beautiful creature as we know that it is lurking around! We are new to the game of camera trapping but we have derived some useful tips for you from what we have learned so far: 1. Camera trap batteries can last a very long time as the cameras are very power efficient. We found that the limiting factor is usually the size of the memory card. So be sure to use a large enough memory card as these cameras can take a lot of photographs especially when you get unlucky with a blade of grass! Which brings us to the next point….. 2. Clear the immediate area in front of the trail camera that is being observed by the camera. Clear anything that can sway or fidget in the wind, especially in open spaces where wind can be a real factor. Even one blade of grass swaying in the wind can trigger the motion sensor and the camera will take too many photographs of this piece of moving foliage. These cameras could be left out for up to two or more months! That’s a lot of pictures of grass to go through! And if the memory card gets filled up after just a few days then the camera trap could be standing dormant and not capturing animals for over a month! 3. Place the camera on an established game path or an area where you suspect animal activity, identified by spoor or droppings. Not surprisingly, animals like humans prefer to use a trail. If it is placed randomly in the forest you may end up only capturing the odd field mouse. 4. Place the camera at around hip height. Depending on where you live, this height will capture most animals. Lager animals like bush buck will fit into the field of view but the camera can also capture smaller animals that scurry closer to the ground like civets, genets and even otters. 5. It’s not a bad idea to check the cameras often. We find that our very curious baboons take an interest in these cameras and can shift the camera view during their investigations. 6. Although these cameras are fairly weather resistant we place silica gel bags (the small packets of beads you find in new running shoes) into the battery compartment. These silica gel bags are designed to absorb moisture and ensure our cameras stay dry on the inside no matter the weather. 7. Rechargeable batteries. Trail cameras almost all use AA (penlight) batteries. They either use 4 or 8 batteries at a time. (hint; even cameras that can take 8 batteries are designed to operate with only 4 but for shorter time periods). We have chosen to go rechargeable as if you have a number of cameras taking 8 AA batteries the expenditure on batteries can be considerable. Rechargeable batteries are more expensive but the investment soon pays off. Especially if, like us, your cameras are up most days of the year. 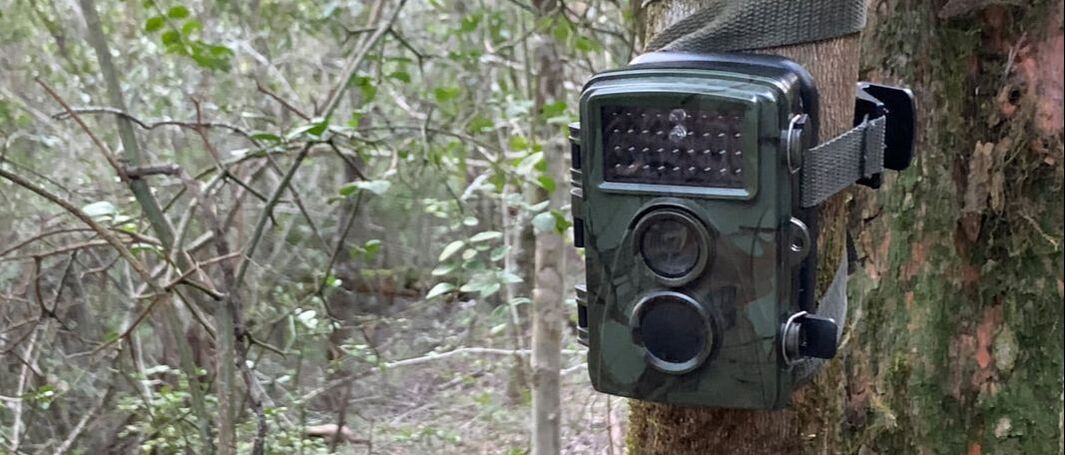 Choosing your camera Lastly we would like to talk about price tags and camera options. Trail cameras have historically been expensive pieces of tech but in recent times there are a greater number companies producing these cameras and prices have become more reasonable with a more competitive market place. The price of trail cameras starts from around R2500 (or less) for a basic camera and can reach quite exorbitant amounts for the top of the range cameras. So what is the differences between a cheaper camera and cameras with larger price tags? More expensive cameras come with more sophisticated features like being able to take a sim card and SMS pictures that are sent live to your cell phone. Some cameras also connect to Wi-Fi with long ranges and can be setup to link up with each other to further extend the range. These setups also allow the cameras to send live feed back to your laptop or cell phone device. These features aren’t really that necessary at all and we find that there are two specifications that really matter; the resolution of the photograph and the trigger speed. The resolution is of course the quality of the image measured in megapixels (MP) and can range from around as little as 2MP to over 20MP. We find that you need at least 5MP to get a reasonable image and anything larger than 8MP gives you a much sharper image. If you are looking for quality images don’t go less than 8MP. The second important consideration is the trigger speed. The trigger speed is the camera's ability to reset after taking a photo to be ready to take the next one. Cheaper cameras typically have slower/longer trigger speeds. The shorter the trigger speed the better. Cheaper cameras typically have a trigger speed of 5 seconds. This may not sound so bad but an animal can easily pass your camera in that time. As an example of many situations; if the camera was triggered by the nose of a passing animal and thus only capturing an image of its nose it will miss the rest of the animal as it passes during those 5 seconds. Top of the range cameras can have trigger speeds of 0.25 seconds or less. These cameras are expensive so just get the lowest trigger speed you can for the money you have set aside for a camera. Night-time capturing. All modern trail cameras are equipped with the ability to take nocturnal photographs. The difference between cameras in this regard is the type of flash they come with. There are three main options; a normal flash, glow flash and black flash. A normal flash will give you a color image as it lights up the area as it captures an image. This usually gives a high quality color image but it is very startling to any passing animals and can often scare them off. A glow flash is an infrared flash that utilizes infrared LED’s. This is a far subtler flash and the LED’s glow a dim shade of red as the photograph is taken. Some animals are still able to see the camera during its flash sequence but are more curious of it than scared and you will often see in your images the animal approaching and investigate the camera. This image is crisp but will be taken in black and white. The last type of flash is the black flash. This flash also uses infrared but has no light or even glow emitted from it whilst it captures an image. As it also uses infrared, the image will be in black and white. This camera is far stealthier and attracts no attention to it at night. It’s very useful for anti-poaching as people won’t see it and for people concerned with theft of their camera when leaving it out somewhere overnight. We hope that these tips will come in handy in your endeavors to find out what’s around you! Happy camera trapping! 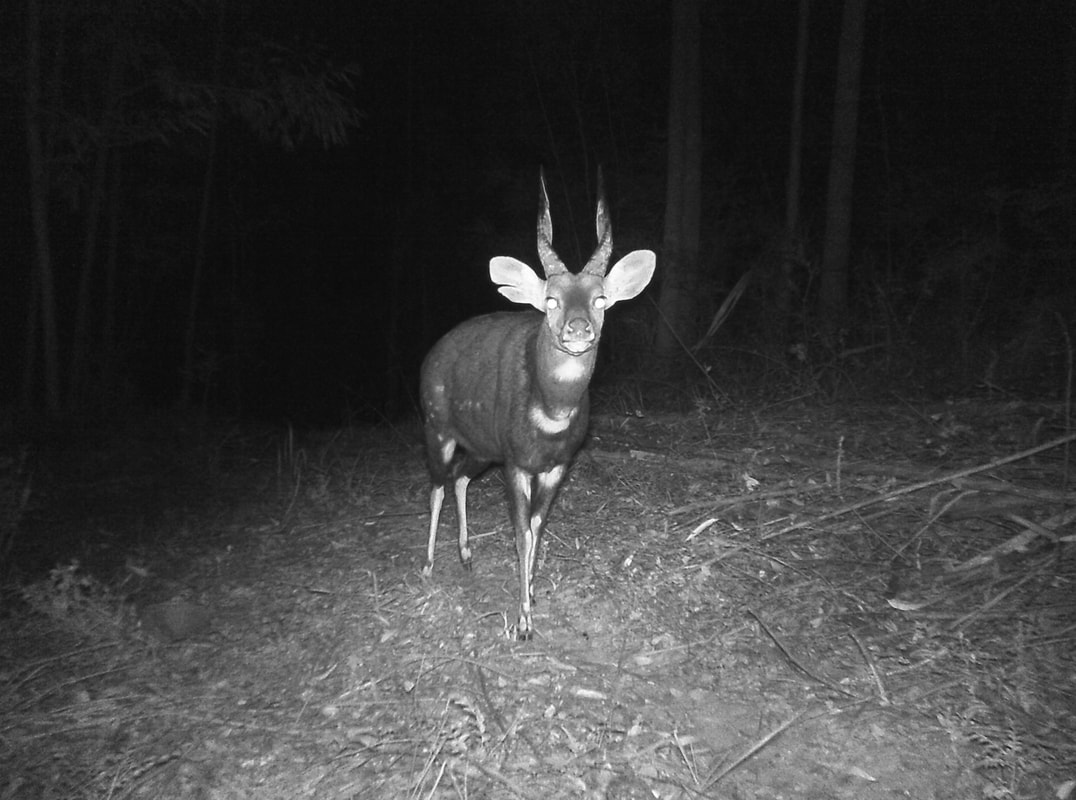
0 Comments
Your comment will be posted after it is approved.
Leave a Reply. |
AuthorLife in a forest in the mountains Archives
March 2023
Categories |
Strawberry Hill Farm
 RSS Feed
GET IN TOUCHPHONE/WHATSAPP:
|
EVENTS |